It now seems a very long time ago that I removed the suspension from the car. Who could forget the episode of the flying ball joint splitter or the epic struggle with the rear end of the prop shaft?
After removal, all in one lump, the rear bit was easily reduced to manageable bits on the floor. Most of these were stored on the garage shelves and many of them fell off again so I put them in a corner, covered them up and forgot about them until the day came when I really had to get on and do something.
In episode five I recounted the tale of the first efforts at grinding off rust. This encompassed all of the suspension bits front and rear because they obviously get a lot of hammer from the weather. The diff nose casing on the other hand being made of alloy needed very little attention. The once rusty bits were treated to a couple of coats of No 1 before being painted shiny black, a process which made them lovely and clean to handle when dry and which made me once again unwelcome in the house on account of the quantity of paint stuck to my shoes (and subsequently to the carpet).
On close inspection it was evident that most of the rear suspension bushes were well shot so I ordered a new set from one of the catalogues and set to to remove the old ones. This involved setting fire to the rubber bit with the welding torch and keeping going till the centre metal tube could be knocked out. Have you ever seen one of those demonstration films in which an armchair is ignited and the room fills with poisonous black smoke in two minutes? Well that‘s what happens to your garage when you burn bushes inside! The rest were done outside which turned out to be much safer. A hacksaw through the rubber and outer metal soon has them loose enough to knock out.
I polished up the holes where the bushes go and as soon as they arrived I had a go at pressing one in with the vice. It was a good vice as tiny three inch woodworkers vices go so it lasted all of five minutes and no bushes. Well I needed a new one anyway. (I bumped into Don in town one day on his way to purchase the biggest vice he could find. The new vice has survived Don‘s efforts but unfortunately the bench it was attached to didn‘t. Ed!)
And so to Fred‘s one Thursday night for a lesson in pressing. This as it turned out was a good move because not only has Fred got a huge vice but he‘s such an enthusiastic teacher that he‘d pressed in most of the bushes before he realised that I hadn‘t done any of it yet. Tony cut a length of scaffold pole to act as a large socket but as he cut in on the slant we did without. However he took it off to work to cut square for next week when we would finish the job. Then he forgot it and we managed anyway. (who‘s this we again? Ed!)
And so to put it back again. Mindful of the problems of deconstruction I cleared out every paint filled hole and trial fitted everything together before committing to the real job. This went well at first as the cross member and lower links followed the rehearsal pattern closely. The new rear springs also seemed to be fitting well till I realised that far from compressing as I jacked up the bottom link the car was rising inexorably off the axle stands, not being heavy enough in it‘s denuded state to compress the springs. Ten sand bags, two drive shafts and sundry tools in the boot sorted that.
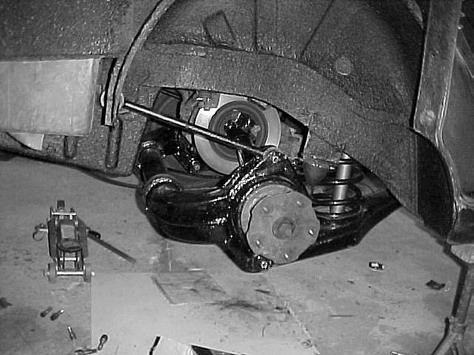
Then I tried to offer up the differential, complete with brake calipers and discs, and it wasn‘t until it had fallen off the jack several times, rather than mate up with the bolt holes, that it occurred to me to put it on the nice wide flat trolley, with no balance problems, and then jack up the trolley that it actually became easy. (It‘s funny how Barry, Fred and I have never had the same problem, Ed!) De Dion tube and rear top link finished the job relatively easily. So far so good.
I think a veil should be drawn over the insertion of the drive shafts. A simple task on the face of it. Bolt the hubs to the de Dion tube ends and then to the final drive through the discs. Sadly the drive shafts didn‘t reach the discs. I presume that the powerful rear springs pushed the suspension down a long way and the new bushes made it resist squeezing inwards with the result that many hours were spent practicing my expletives. I could swear for England now. Next time I‘ll make up some studs from threaded rod and draw everything in gracefully. Why do you only come up with the best answer after the event? (The awful possibility remains that I‘ve done something wrong! Can‘t see it as yet but your sceptical editor believes so. These things have a habit of becoming obvious in the most emphatic way. I‘ll report if it happens and I survive it!)
Never mind - the front suspension was dead easy. I just stood and watched Tony practice swearing for two hours burning out a bottom ball joint. We did have a ball joint extractor specifically for that joint but all it did was pull out the taper and ball and leave the casing very firmly in place. The only way to get it out was to burn almost right through it whilst hammering like mad with a cold chisel. (This is holding the leg in the aforementioned woodworking vice attached by a thumbscrew to the bench! Why didn‘t he buy the new vice before he started all this?) For some reason Tony was reluctant to let me do either the burning or the hammering in his presence. I can only suppose he was enjoying himself too much. When it finally fell out the strut was so hot that the new one almost fell in. In view of the two hours taken to extract the old one we made a rapid re-evaluation of the other side and declared it (probably) fit for service.
The top joints are bolted in place and have a flange all round which can be hammered, so they came out OK and the new ones pulled in on the bolts. Can it be going my way at last? (I‘ll regret that won‘t I?)
Fitting these front struts was pretty easy even for me so now the car is actually ready to receive its wheels for the first time. A magic moment!